
Get your manuscript ready and I will guide you, step by step in the creation of a handmade book.
 This is one of my miniature books, Destellos de Sofía.
 Materials:
• your manuscript
• mat board
• decorative paper
• text paper
• paper cutter or mat knife and ruler
• awl
• bone folder
• a piece of corrugated cardboard attached to a piece of matboard
• needle
• thread (button thread works great)
• ruler
• headband
• thin ribbon
• acid free pva glue
• a small piece of cotton cloth or thin paper
• template
 |
| Template: Click on this image to enlarge and print on an 8.5" x 11" paper. |
 Design the pages: I placed 4 pages on one 8.5 x 11 paper. Horizontally, they go: 2-3, 4-1 on the top row.
I do the layout in Photoshop (you can use any program that has text boxes, including MS Word). I then print the same document on both sides of the paper. For each paper I print, I get 8 little pages, 2 of each. (Each row gives me 2 of the same page.) I used Epson matte double-sided paper on the highest quality of my Epson printer for this book in order to make sure that all the details of the little drawings were visible, even though they are greatly reduced from the original size.
Cut the pages
 If
you use use a regular 8.5 x 11" paper, then you don't have to cut, just
fold in half. Since my book is 1/8 of the paper, I cut the paper in
half until I get the individual pages.
If
you use use a regular 8.5 x 11" paper, then you don't have to cut, just
fold in half. Since my book is 1/8 of the paper, I cut the paper in
half until I get the individual pages. These
are the pages for each book. I design the book so that, with the first
cut, I can have all the pages for one book together. That way I save
time and effort later.
These
are the pages for each book. I design the book so that, with the first
cut, I can have all the pages for one book together. That way I save
time and effort later.This is the process for cutting the pages:
 Put both ends together, and press on the fold.
 Do that on both ends.
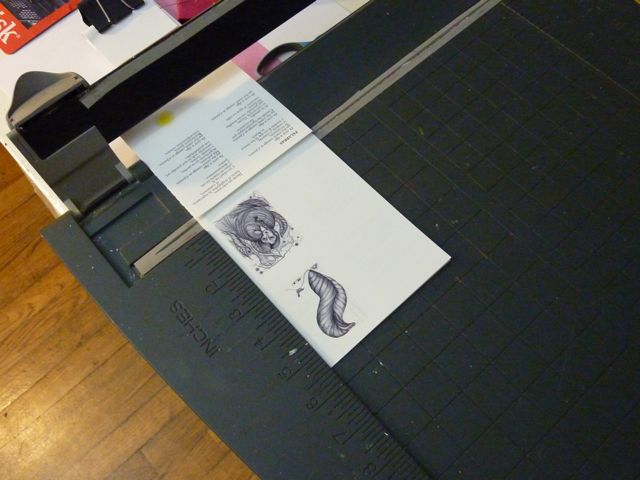
 Place on paper cutter or place your ruler, guiding yourself by the pressed points.
 Cut.
Cut. Don't worry about the edges. They look better a little rustic!
 Here you see, from left to right, a bone folder, an awl, a template and a set of pages for my book.
 Create a template for punching holes on your pages by perforating 4 holes on a spare page of the same size as your book pages. Fold the page in half downward and use the awl to punch two holes on the middle fold. This will give you 4 even holes. Or you can use a ruler and measure the placement of the 4 holes.
Fold each page in half and reopen it. Folding the pages before punching them makes it easier to perforate them.
Use the template to perforate a few pages at a time. Place them on a piece of corrugated cardboard backed by a regular piece of mat board. This will help you punch the holes with less effort.
Fold each page in half again and order them, side by side.You can use the bone folder to press on the fold and make it tighter. This will help the book stay closed.
How to poke holes on our pages.
Here is a little video to help you:
Sew the book
Next, after we perforate all the pages, we place them in order, side by side, like this:
Next, after we perforate all the pages, we place them in order, side by side, like this:

Now, we will sew the pages:
Thread a needle with a strong thread long enough to sew all the pages.


Next, hold the first page and insert the needle through the first hole.

Think about what is logical to do now. This is important to realize because it will make your sewing easier. It would be logical for the needle to come out through the next hole. Do it!
Leave some thread hanging out of the first hole. We will tie it when we finish.
Next, make the needle go in and out of the next set of holes on the page.

The first page is ready! Now we do the same for all the other pages.

Insert the needle through the hole that is right next to where it came out from. Always do what is logical and easier. The pages of the book will tell you what to do. Repeat for each page.

Two pages will look like this.

Inside, the stitches should look like this.

Here you can see all the pages are attached to each other, except for the last one.

Use the needle to gather and tie all the center stitches. Tie the loose end from the first page as well. It does not matter how it looks. We will hide this part of the book and nobody will be able to tell how good your stitching is!

Pour some glue all over the spine of the book.
 Spread it, but make sure it is a thick layer.
 Place a piece of cotton cloth over the glue to bind it and hide the stitches.
 Measure two pieces of headband to place on both ends of the spine.
Cut a piece of ribbon for a bookmark and glue it to the spine. Then glue both pieces of headband.
The inside of your book is ready!
Homework: Let it dry. Cut two pieces of decorative paper the same size as the book pages.
Your beautiful book is almost ready! Next and last, how to make the book cover and finish the book.
Make the book cover
You'll need the cover paper, mat board, a picture that is smaller than the cover, scissors, mat knife, ruler, bone folder, awl, acid free glue, inexpensive paper for a template, and decorative paper for the end pages.
 I
chose to make the cover of my book like a little frame to hold one of
the drawings that accompanies a poem in the book. These are my first
tries at the final design of the cover, one of them was finally right!
I
chose to make the cover of my book like a little frame to hold one of
the drawings that accompanies a poem in the book. These are my first
tries at the final design of the cover, one of them was finally right! I
first made a template with the measure of the paper and the picture, so
I could cut out the rectangle. I designed it in Photoshop, and used the
picture to cut it at exactly the size I needed for the cover. You can
see the edge of the drawing around the opening. I cut out the picture
but left a thin edge so the decorative paper will completely cover the
edges of the picture.
I
first made a template with the measure of the paper and the picture, so
I could cut out the rectangle. I designed it in Photoshop, and used the
picture to cut it at exactly the size I needed for the cover. You can
see the edge of the drawing around the opening. I cut out the picture
but left a thin edge so the decorative paper will completely cover the
edges of the picture.The template also helps me align the cover paper and the boards that will form the hard cover.
 Place the template on the cover paper.
 Use a ruler to score/cut out the rectangular opening.
 Here
is the scored rectangle. You may want to cut, but I only half cut
because I am looking for a rugged edge. Decide what you want at the time
you are designing the cover of the book.
Here
is the scored rectangle. You may want to cut, but I only half cut
because I am looking for a rugged edge. Decide what you want at the time
you are designing the cover of the book. Scrape with an awl to complete the cut.
 With
a bone folder, I smoothed and pushed out the edge of the paper. This
paper is Somerset Velvet, which is very thick. It is, in fact, almost
too thick for this project. Try to choose a paper that is cover weight at the most, and the process will be easier.
With
a bone folder, I smoothed and pushed out the edge of the paper. This
paper is Somerset Velvet, which is very thick. It is, in fact, almost
too thick for this project. Try to choose a paper that is cover weight at the most, and the process will be easier. Cut out the front cover illustration.
 Now you have finished two important parts of the cover.
 Use
a rotary cutter to cut the mat board the size of your cover. Notice I
placed a piece of transparent tape to guide me. How do you measure the
size of the pieces of the cover? Take one folded page of the book. Align
the fold with the edge of the mat board. Measure about 3 millimeters
above each of the remaining 3 edges of the mat board. The mat board will
be slightly bigger on only 3 sides. The remaining side, which will go
with the spine, will align with the pages of the book.
Use
a rotary cutter to cut the mat board the size of your cover. Notice I
placed a piece of transparent tape to guide me. How do you measure the
size of the pieces of the cover? Take one folded page of the book. Align
the fold with the edge of the mat board. Measure about 3 millimeters
above each of the remaining 3 edges of the mat board. The mat board will
be slightly bigger on only 3 sides. The remaining side, which will go
with the spine, will align with the pages of the book. Cut
the first piece. You will need 2. Here I measured mat board to fit two
covers and one spine, as you will see in the pictures below.
Cut
the first piece. You will need 2. Here I measured mat board to fit two
covers and one spine, as you will see in the pictures below. Measure the spine to be the same size as the spine of your bound pages. Cut.
 This is the spine. The remaining cardboard is the back cover.
 My
remaining cardboard is a little bigger than the size I need. Cut the
extra material to make the back cover the same size as the front cover.
You can recycle the extra pieces to help you spread glue.
My
remaining cardboard is a little bigger than the size I need. Cut the
extra material to make the back cover the same size as the front cover.
You can recycle the extra pieces to help you spread glue. Glue the picture onto the one of the boards.
 Place the board under the opening of the cover paper and align it.
 Glue the cover paper to the front cover.
 Use
the placement of the first board to align the spine and the back cover.
Notice the spaces between the pieces. If you do not leave space, your
book will not close properly. How much space you need depends on the
thickness of your cover paper and bound pages, so you might need to
experiment and waste some supplies. It's inevitable, but it is also
worth it.
Use
the placement of the first board to align the spine and the back cover.
Notice the spaces between the pieces. If you do not leave space, your
book will not close properly. How much space you need depends on the
thickness of your cover paper and bound pages, so you might need to
experiment and waste some supplies. It's inevitable, but it is also
worth it. All pieces are glued.
 Cut the corners leaving a small edge.
 Use the bone folder to press the cover paper on the edge of the covers, top and bottom.
 Fold the top and the bottom edges.
 Glue the edges. I use wax paper to prevent the glue from sticking to my fingers.
 Both the top and the bottom are glued.
 Before gluing the sides, fold the corners. This will give your book corners a nice finish.
 All four corners are folded in.
 Use the bone folder to press the remaining sides.
 Glue.
Glue. Use the bone folder to press where the book will fold.
 The cover is done!
 Now, glue the end pages to the last pages of the book. (Cutting these was your homework in the previous tutorial!)
 Fold the end pages. Insert in the book cover, all the way to the spine. Glue the end pages to the cover.
 This is the end page glued to the cover.
 Now close your book, and enjoy it!
Find Materials for my tutorials in Blick U by looking up Tanya Torres Art Studio in the "Registries and Lists" menu. The materials for this workshop appear under the title "Bookmaking Tutorial."
If you want to learn to make a book in person, sing up for the Coptic Biding Bookmaking Workshop at La Casa Azul Bookstore on June 29.
Find a list of materials here: http://www.dickblick.com/lists/blicku/RAPTGTO5HQF4A/items/
4 comments:
Great article ...Thanks for your great information, the contents are quiet interesting. I will be waiting for your next post.
Great tutorial.. but i'm lost as to what the rubber band is for.. i tried without it and it looks as good, but i feel like i missed a step.
I think you mean the "headband". It is optional. Just gives it a nice finishing, but it works without it as well!
Is there a was to print them out for a 1 inch book?
Post a Comment